Sourdough Puff Pastry
If puff pastry feels intimidating, you’re not alone. Layers, lamination, timing—it can sound like something best left to professional bakeries. But this sourdough puff pastry proves that with patience and a few key techniques, you can make bakery-quality, flaky pastry right at home.
This recipe combines the classic French lamination method with natural fermentation from sourdough starter, resulting in a dough that’s deeply flavorful, crisp on the outside, and tender inside. Whether you’re baking savory pastries, elegant appetizers, or cozy weekend treats, this dough is a true workhorse—and one worth mastering.
What Makes Puff Pastry “Puff”?
The magic of puff pastry comes from lamination—the process of folding butter into dough over multiple turns. As the pastry bakes, steam from the butter and dough forces the layers apart, creating that signature flaky rise.
In this sourdough version:
- The dough is fermented first, developing strength and flavor
- Cold butter is layered inside the dough through repeated folds
- Time and temperature do the heavy lifting
No shortcuts—just technique.
Why Make Puff Pastry with Sourdough?
Using sourdough starter in puff pastry does more than add character—it transforms the dough entirely.
Benefits of Sourdough Puff Pastry:
- Improved flavor: Subtle tang balances the richness of butter
- Better digestibility: Long fermentation helps break down gluten
- Natural leavening: No commercial yeast required
- More structure: The dough is surprisingly forgiving during lamination
This makes sourdough puff pastry ideal for home bakers who want depth of flavor and reliable results.
Tips for Successful Sourdough Puff Pastry
1. Temperature Matters
Cold dough + cold butter = clean layers. If the butter starts to soften too much, pause and refrigerate.
2. Don’t Rush the Turns
Those 30-minute fridge rests aren’t optional—they relax the gluten and prevent tearing.
3. Roll with Intention
Apply even pressure and rotate the dough as you roll. Uneven thickness can cause butter to break through.
4. Use Visual Cues
You should see faint butter layers inside the dough without visible leaks.
How to Use Sourdough Puff Pastry
Once laminated, this dough becomes a blank canvas. Here are a few favorite ways to use it:
Savory Ideas
- Fig jam, brie, and pancetta (a favorite combination)
- Ham and cheese pinwheels
- Mushroom and thyme turnovers
- Caramelized onion tarts
Sweet Ideas
- Fruit-filled hand pies
- Cinnamon sugar twists
- Chocolate batons
- Rustic galettes
This dough can be rolled thin or left slightly thicker depending on how dramatic you want the layers.
Can You Make It Ahead?
Yes, and this is one of the best parts.
After lamination, sourdough puff pastry can:
- Rest in the fridge for up to 3 days
- Be shaped and baked directly from cold
- Be frozen for future use (wrap tightly)
This makes it ideal for holidays, entertaining, or batch baking.

Sourdough Puff Pastry
Ingredients
- 250 g All-Purpose Flour
- 70 g Active Starter
- 110 g Water room temp
- 6 g Salt
- 35 g Butter for dough
- 215 g Butter for lamination
Instructions
- Add the flour, starter, water, and salt to the bowl of a stand mixer. Mix on low with the dough hook until combined.
- Increase the speed to medium, and add your butter. Mix until the dough pulls away from the sides of the bowl.
- Cover your bowl and let the dough rise at room temperature for about 8 hours (based on a 71-72° home/ambient temperature – if your environment is colder, proof for longer).
- Cover the bowl and place the dough into the fridge to cold-proof overnight.
- The next day, prepare your lamination butter. Allow the butter to soften at room temperature. Take a large piece of parchment paper and fold it into a 6-8” packet. Place the butter inside the parchment and roll/press it into a 6-8” square using a rolling pin.
- Place the butter packet into the fridge. When you begin the lamination process, you want the butter to be cold but still malleable.
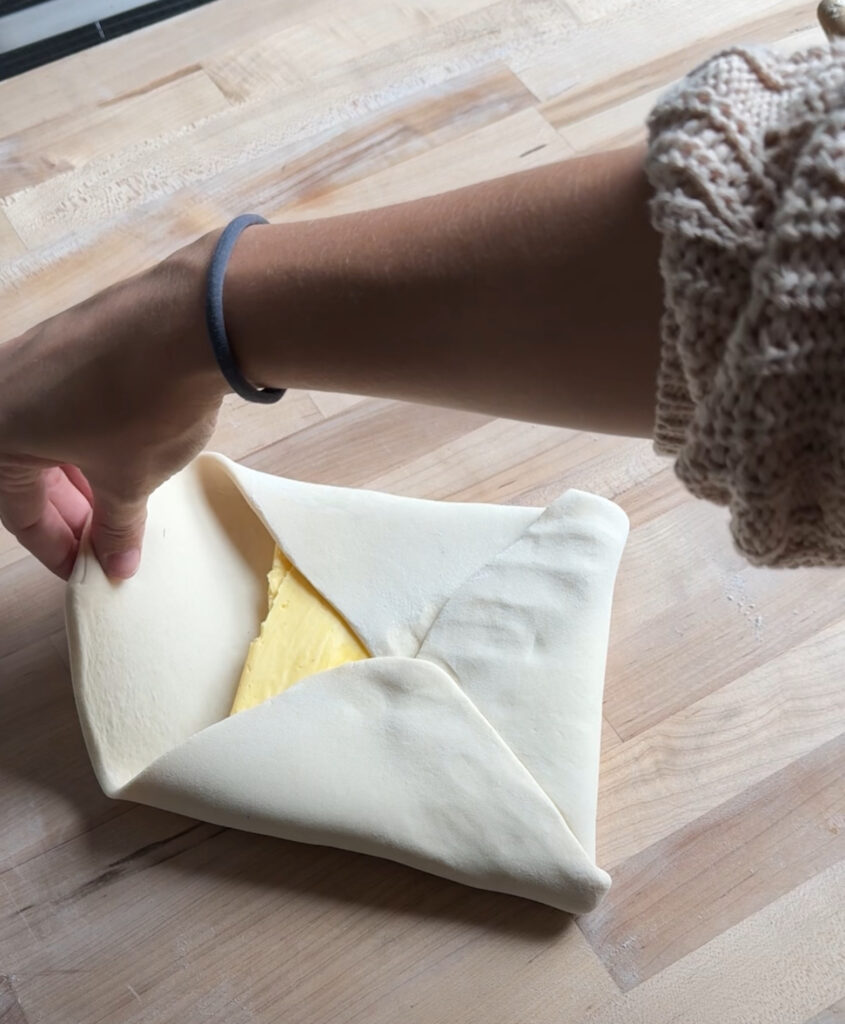
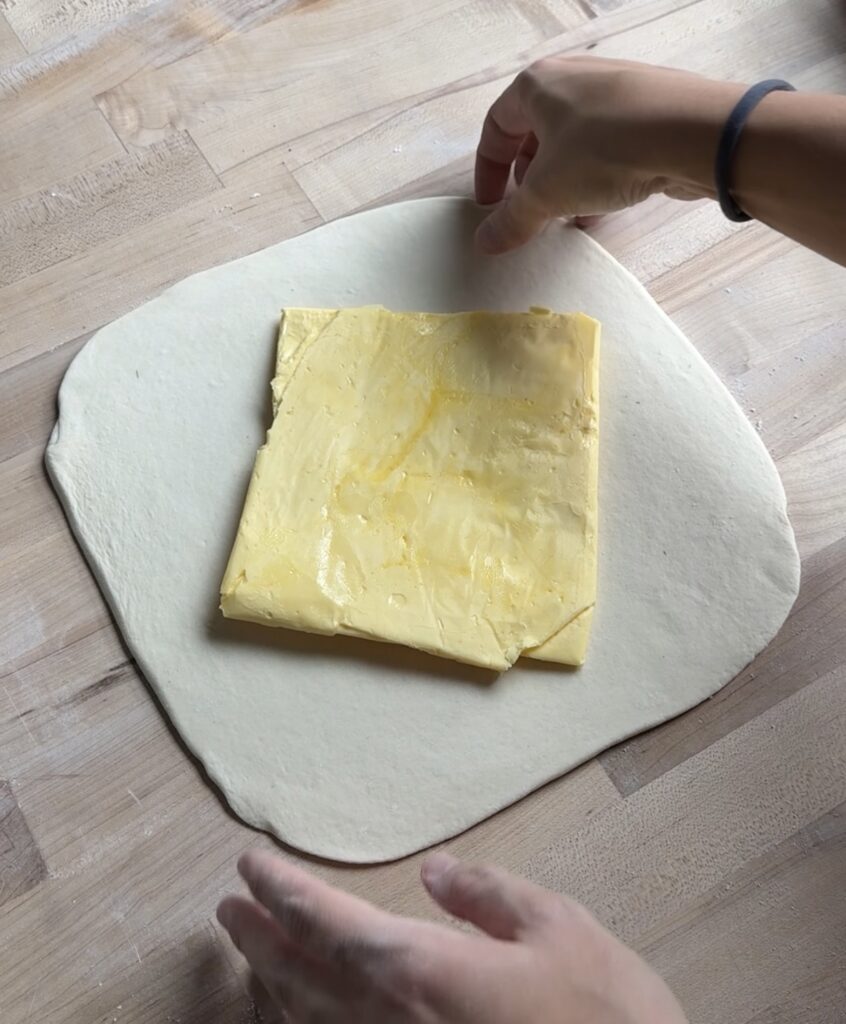
- Roll your dough into a 12” square on a floured surface. Place the cold butter sheet on the dough at a 45° angle so it forms a diamond on top.
- Bring the corners of the dough to the center of the butter, sealing the butter inside. Press the edges of the dough together to create a tight seal.
- Carefully and evenly, roll the dough into a rectangle (roughly 9”x18”). As your roll, be mindful not to let the dough rip or tear – you want the butter to stay encased at all times.
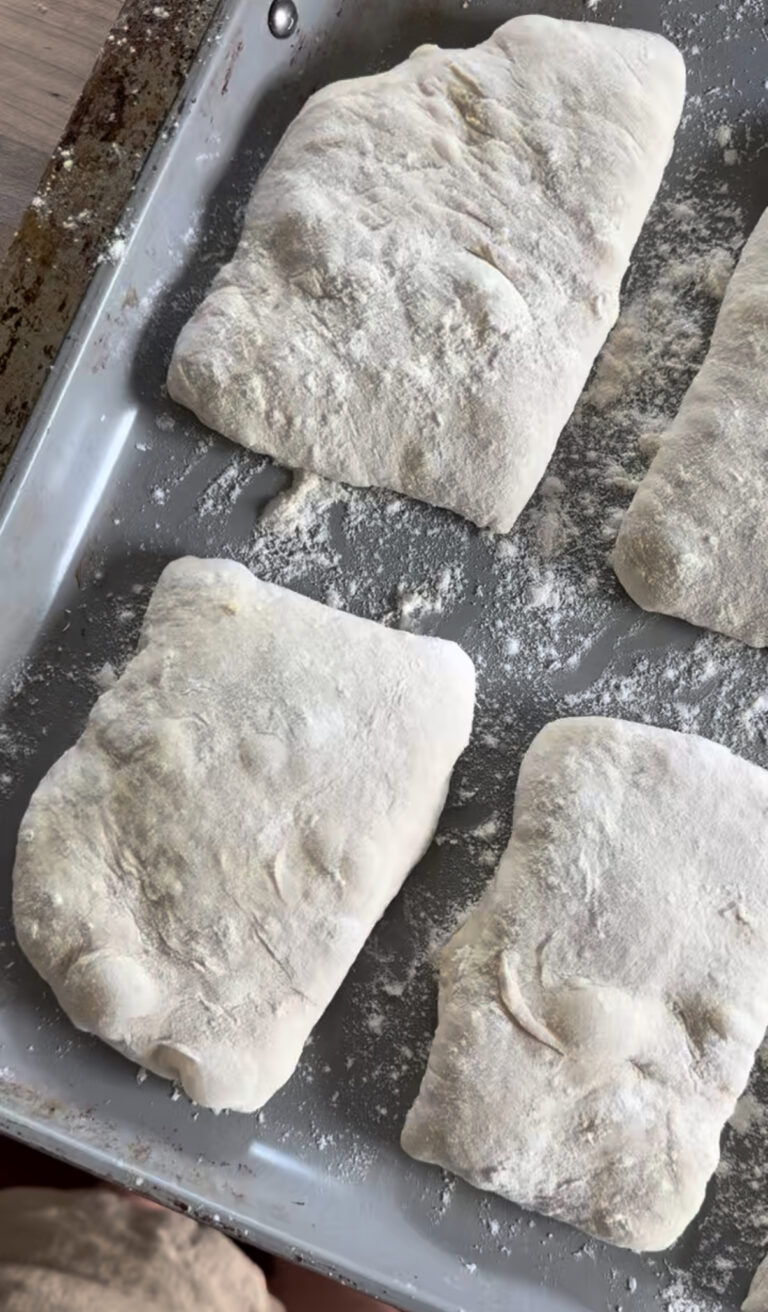
- After creating a thin rectangle, fold the dough over itself in thirds, creating a pamphlet. Cover with plastic wrap and refrigerate for 30 minutes.
- Repeat the laminating process 3 more times, with a 30-minute rest in the fridge between each turn.
- Allow the dough to rest in the fridge for at least 2 hours (and up to 3 days) before using.
- When you’re ready to bake, roll your dough to the thickness you prefer.
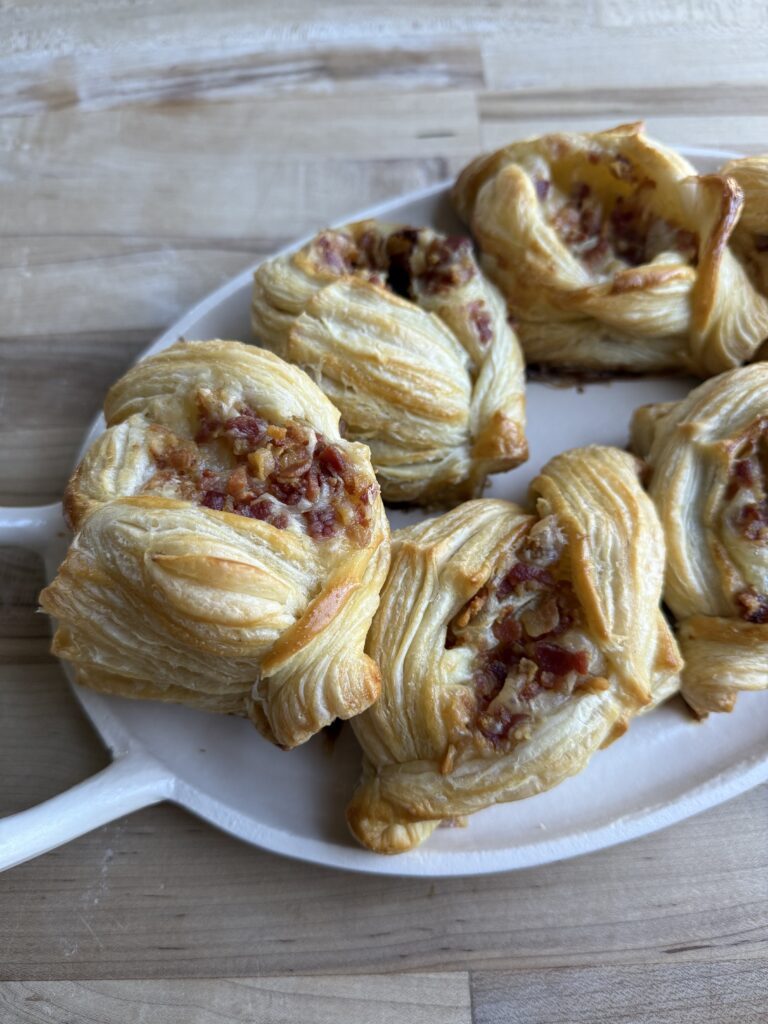
- The shaping possibilities are endless, so get creative! Shape and fill your pastry as desired. Inspiration: I love to add fig jam, brie cheese, and fried pancetta to mine!
- Brush with egg wash before baking for the perfect shine.
- Bake at 400°F until golden brown (time will vary based on how you shaped your dough and the fillings you use). I made 8 square pastries and baked them for 20-25 minutes.
this was worth every minute!! so delicious
So tasty!!!
Felt like I was back in Paris for this one. So good
Look, I was not a puff pastry guy…WAS…until now!
Absolutely amazing! Can’t wait to make these again
Incredibly flaky with rich, buttery layers! I appreciate the visuals for the lamination steps, super helpful!
My FIRST try at puff pastry. The recipe was so easy to follow and so delicious! I added raw cheddar and bacon!