Artisan Sourdough Bread (Beginner Friendly)
This beginner-friendly artisan sourdough bread recipe is designed to teach you the why behind each step, not just the how. It’s a single-loaf recipe with clear fermentation cues, flexible timelines, and a structured method that helps new sourdough bakers build confidence while still producing a beautiful loaf.
If you’ve been searching for an easy sourdough bread recipe for beginners, this is a reliable foundation you can return to again and again.
Recipe overview
- Yields: 1 sourdough loaf
- Skill Level: Beginner
- Hands-On Prep Time: ~20 minutes
- Total Fermentation Time: Approximately 24 hours (flexible)
recommended equipment
- Baking scale
- Cooking thermometer (for dough temperature)
- Bench scraper
- Banneton or proofing basket
- Scoring blade or sharp razor
- Dutch oven with lid
- Parchment paper
While all of these tools are helpful, the most important for success are a scale, Dutch oven, and a reliable thermometer.
Flexible Sourdough Baking Timelines
One of the most common beginner mistakes is thinking sourdough has only one correct schedule. Below are three sample timelines that show how flexible sourdough can be.
Timeline #1 (Evening Feed, Morning Mix)
Day One
9:00 PM – Feed starter using a high-ratio feeding (1:5:5)
Day Two
7:00 AM – Mix dough + stretch-and-folds
3:00 PM – Shape dough and place in fridge for overnight cold proof
Day Three
Bake anytime
Timeline #2 (Morning Feed, Midday Mix)
Day One
7:00 AM – Feed starter using an equal-ratio feeding (1:1:1)
12:00 PM – Mix dough + stretch-and-folds
8:00 PM – Shape dough and place in fridge for overnight cold proof
Day Two
Bake anytime
Timeline #3 (Cold Water Mix, Shorter Cold Proof)
Day One
12:00 PM – Feed starter (1:2:2)
7:00 PM – Mix dough using cold water + stretch-and-folds
Day Two
7:00 AM – Shape dough and place in fridge for a shorter cold proof
5:00 PM – Bake
These timelines are examples—not rules. Your environment, starter strength, and dough temperature all matter more than the clock.
Ingredients (Baker’s Percentages Included)
- 305g warm water (73%)
- 85g active sourdough starter (20%)
- 360g all-purpose OR bread flour (88%)
- 60g whole wheat flour (12%)
- 8g salt (2%)
- Rice flour, for dusting the banneton
Total flour: 420g
Ingredient Notes for Beginners
- A blended flour loaf (all-purpose/bread flour + whole wheat) adds flavor while remaining beginner-friendly.
- Your starter should be active, bubbly, and recently fed before mixing.
- Warm water helps encourage fermentation, especially in cooler kitchens.
Bulk Fermentation: The Most Important Skill to Learn
Bulk fermentation starts the moment the dough is mixed, not after folds are finished.
Why Temperature Matters
Warmer dough ferments faster. Cooler dough takes longer. This is why dough temperature is more reliable than the clock.
Approximate Bulk Fermentation Windows:
- 80°F: ~6 hours
- 75°F: ~7–8 hours
- 70°F: ~11–12 hours
- 65°F: ~16 hours
This temperature chart is a helpful guideline, not an exact science. Because we do not live in a giant proofing box, your dough will want to naturally match the ambient temperature over time. For example, if your dough is 80°F and your house is 68°F, your dough will take longer than 6 hours to proof. Meeting the chart in the middle and honing your baker’s eye is essential!
How to Know When Bulk Fermentation Is Done
Perfectly fermented dough will:
- Look puffy and well-aerated
- Show bubbles on the surface and edges
- Release easily from the bowl
- Feel elastic, light, and slightly domed
If your dough feels slack, sticky, or dense — it needs more time.
Shaping: Creating Surface Tension Without Deflating
Shaping isn’t about forcing the dough into submission. It’s about organizing the structure you’ve already built.
A good shape:
- Feels tight but not torn
- Has visible surface tension
- Holds its form during bench rest
If the dough spreads too much, resists shaping, or tears easily it may be over or under proofed.
Preventing Burnt Bottoms
If your loaf browns too quickly on the bottom:
- Add a thin layer of uncooked rice beneath the parchment inside the Dutch oven
- Place a pizza stone or baking steel on the rack below the Dutch oven
Cooling and Storage
Remove the loaf from the Dutch oven and cool completely on a wire rack for several hours before slicing. Cutting too early can result in a gummy crumb.
Store sourdough at room temperature, cut-side down, for up to 3 days, or freeze slices for longer storage.
Final Thoughts for Beginner Sourdough Bakers
This artisan sourdough bread recipe for beginners is meant to teach you how sourdough behaves, not rush you to a perfect loaf. With each bake, you’ll get better at reading fermentation cues and adjusting to your environment.
If this is your first loaf, you’re doing it right just by starting. 🤍

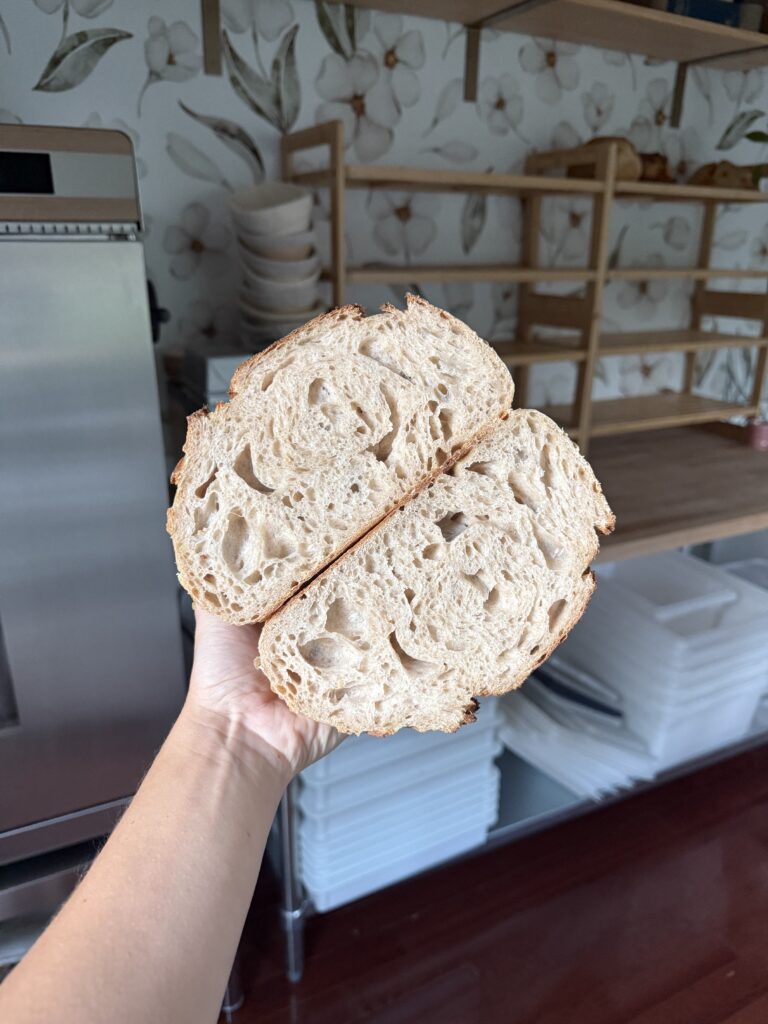
Artisan Sourdough Loaf
Equipment
- Kitchen Scale
- Proofing Basket/Banneton You can use a bowl lined with a tea towel if necessary!
- Baking Thermometer
- Scoring Blade/Sharp Knife
- Dutch Oven
Ingredients
- 360 g All Purpose OR Bread Flour (flour must be at least 11.5% protein)
- 60 g Whole Wheat Flour
- 305 g Water (room temperature)
- 85 g Active Sourdough Starter (fed starter used at it's peak)
- 8 g Fine Salt
Instructions
MIX
- In a medium-sized bowl, add your active (risen and at its peak) sourdough starter and water. Mix thoroughly with a wooden spoon or spatula to create a milky liquid.
- Add the all-purpose/bread flour, whole wheat flour, and salt. Using your hand, mix the dough very thoroughly. Mixing the dough should take a few minutes to ensure there are no dry bits of flour or lumps. Ensure all of the salt has dissolved.
- Cover with a plastic covering or a damp tea towel.
FOLD
- Allow the mixture to rest for 30 minutes to 1 hour.
- After the rest, begin your stretch-and-folds. To perform a stretch-and-fold, start by wetting your hands. Wet hands will keep the dough from sticking to you. Grab the edge of the dough and pull it upward until it begins to resist. Do not allow the dough to rip or tear. Repeat this motion around the perimeter of the dough until each edge has been stretched.
- After your first fold, take the dough’s internal temperature. This will help you determine how long bulk fermentation will last. When finished, place the cover over the bowl, and allow the dough to rest for 30 minutes.
- Perform a total of 3-5 stretch-and-folds, each 30 minutes apart. Make sure you take your dough’s temperature one last time after your final fold.
BULK FERMENT
- Allow the dough to bulk ferment until it is fully proofed. This length of time is dependent on the dough’s internal temperature. Follow the times shown below as a good rule of thumb. The allotted time shown is the total amount of time from the moment you mix the dough to when the dough is shaped and placed in the refrigerator for a cold proof. Bulk Fermentation Guide (from initial mix to cold proof)80°F: 5.5–6 hour75°F: 7–8 hour70°F: 11–12 hours65°F: ~16 hoursThis temperature chart is a helpful guideline, not an exact science. Because we do not live in a giant proofing box, your dough will want to naturally match the ambient temperature over time. For example, if your dough is 80°F and your house is 68°F, your dough will take longer than 6 hours to proof. Meeting the chart in the middle and honing your baker's eye is essential!*See additional notes below for further bulk fermentation guidance.
PRE-SHAPE/REST
- Thirty minutes before bulk fermentation is complete, pre-shape your dough. To do this, remove the dough from your bowl/proofing container. Allow the dough to come out all in one piece, either by letting it slowly release from the bowl or by gently scraping the dough out.
- Place a bench scraper underneath the dough at a 45° angle. Using circular motions, scrape the dough under itself and toward you to create a round, tight ball of dough. The goal is to create a uniform ball of dough with smooth, tight surface tension.
- Sprinkle the dough with a bit of flour, and allow it to rest for 10-15 minutes.
FINAL SHAPE
- Sprinkle a banneton/proofing basket with rice flour. Then, dust a light coat of flour on your shaping surface.
- After the dough has finished its bench rest, use the bench scraper to flip the dough upside down onto your floured surface. The part of the dough that was touching the counter during the bench rest should now be face up.
- Fold the left side of the dough into the center, then do the same with the right side.
- Rotate the dough 90°. Scoop the dough into your hands and fold it in half to seal the left and right sides together.
- Place into your banneton with the seam side up.
- Cover the banneton and place it in the fridge.
COLD PROOF
- Allow the dough to cold proof in the refrigerator for 12-36 hours.
BAKE
- Preheat your oven to 500°F with a dutch oven inside.
- Once your oven reaches 500°F, take the dough out of the refrigerator and flip the dough onto a cut piece of parchment paper. The seam side up in the banneton should now be touching the parchment paper, leaving the smooth side of the dough face up.
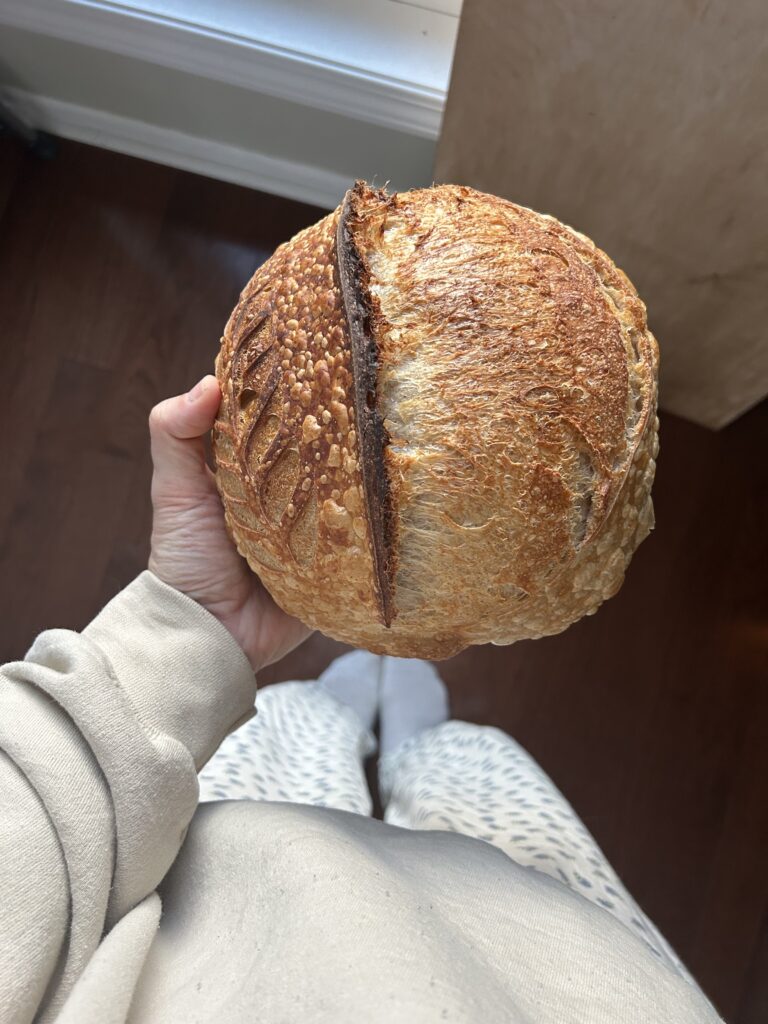
- Score your loaf. You can be creative with decorative scoring, but it is essential that you have one deep score down the length of the loaf. This gives the bread a clear spot to expand. Without this deep score, your loaf will likely burst in random places. When scoring your loaf, use a sharp blade and score at a 45° angle. You want to score about 0.5” deep. Using a sharp blade and a quick motion will be very helpful.
- Move the loaf on the parchment paper into the hot dutch oven. Throw 2-3 ice cubes inside (under the parchment so that it’s not touching the dough). Place the lid on, and bake the loaf at 500°F for 23 minutes.
- After 23 minutes, lower the heat to 450°F and remove the lid. Continue baking for another 15-18 minutes, depending on your preferred color.
- Remove the loaf from the dutch oven after baking and allow to cool. You want your bread to be completely cool before cutting into it (typically a few hours) to avoid a gummy texture.
- Serve and enjoy!
Notes
- Perfectly proofed dough should be risen in size, bubbly on top, NOT sticky, and easy to pull away from the sides of the bowl. It should want to stick to itself more than you!
- The chart is a general guideline, not an exact science. It is crucial in sourdough baking to learn what the dough looks and feels like when it is fully proofed. That skill will come with time, but the chart provides a great starting point.
- The allotted time shown in the chart is the total amount of time from the moment you mix the dough to when the dough is shaped and placed in the refrigerator for a cold proof.
- The temperature of your home and seasonal changes will also affect your rise time. For example, if the dough is 70°F but your house is 80°F, the dough will rise faster than 12 hours. If you are in a hot and humid climate, your dough will likely rise faster.
so beginner friendly!!
Do yourself a favor, stop telling yourself you can’t bake, make this, then make a grilled cheese with it using some decent cheeses. Your life will change
Perfect for beginners! So tasty and explained really well
Been using this recipe for the last 2 weeks. As a beginner, this has been so easy to follow and use with no baking background! 11/10 recommended!
I can’t not say this enough, but this is the OG recipe, the one that started it all. LOVE LOVE LOVE!!
Hi, thank you for recipe.
Question, can I swap out the whole meal for rye flour?
Thank you x
Yes you can! 🙂
I cannot imagine not having this bread in my kitchen anymore. Such a staple in my house, amazing recipe!!
One of the best recipes
Great instructions and thankful for the extra tips to make this work even though I am a beginner baker.
I never imagined I could make sourdough. Thanks for making my dreams come true with this easy to follow recipe. I need this in my kitchen at all times!
Can you please make a video of the full process ? Thank you 🩷
I plan to post a full length video on my Youtube channel this year!
Thank you so much! Amazing recipe! I’ve been baking sourdough for a few years and the results were never 100% consistent. Using your recipe and schedule the loaf came out perfect! ❤️
This is so amazing to hear!
Hi! I tried this recipe and am happy with how it turned out. I want to make several loaves using the increased qty offered when printing. Can you share your prebake loaf weight, please? Also, can einkorn be subbed for wheat? Thank you! It’s been great watching your little business grow!
Yay! The weight is just all of the ingredient weights combined, so around 815g. You can definitely try subbing with einkorn! Let me know how it turns out. 🙂
Excited to try this recipe! I usually feed my starter just AP flour. Should I include the wheat portion into the feeding as well? I have been wanting to include wheat flour but wasn’t sure if I need to start including it into the starter for feedings as well or just for the baking portion.
I only feed my starter with all purpose! This is totally up to preference. 🙂
I have a question. If you take the temp of the dough at the final stretch and fold, what is the ideal temp for when it is finished bulk fermenting is it just “time” until it’s bubbly after that? I use 100% whole wheat and it ferments faster, I believe, so I am still working on this. 😁 Sometimes the wheat acts different even when I treat it the same, so I don’t know if it’s me or the grain. I mill it myself from wheat berries so it could be a batch/season/farm question too. It’s a living product and results may vary!
Thanks Macey!
Hi Valerie! There is no “ideal” temp. The temperature simply tells you how long the dough needs to rise for.